


How to Place an Order

Store Pick Up

Request for Quotation/ International Sourcing

Order Status

Reference: RBD-1354
Length: 8 inches/20 CM (Long) Material: Copper Plated Pin Spacing: 2.54mm.
Reference: RBD-0351
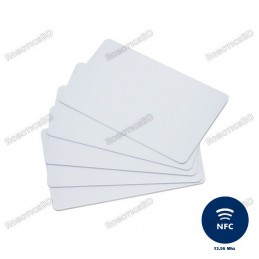
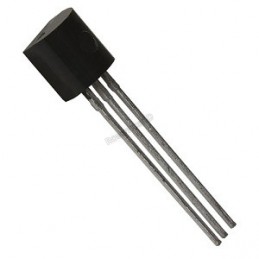
Contactless transmission of data and supply energy (no battery needed) Operating distance: Up to 100mm (depending on antenna geometry) RoboticsBD Operating frequency: 13.56MHz Data transfer: 106 kbit/s Data integrity: 16 Bit CRC, parity, bit coding bit counting Anticollision Typical ticketing transaction: <100 ms ( including backup management)...
Reference: 0245
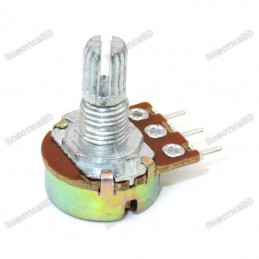
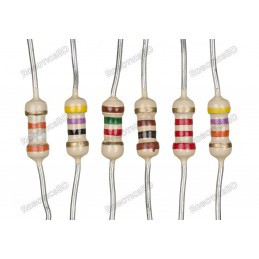
Choose your desire Resistor value from below:
Reference: 0031
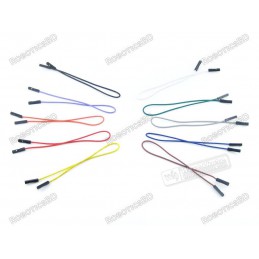
3 Types Available (Please select from option) 1. Male to Male 2. Male to Female 3. Female-Female
Reference: RBD-0768
Size: 5mm Color: RED Head Shape: Round Lens Appearance: Transparent
Reference: RBD-0761
Breadboard friendly Mounting Style: Through Hole Mounting Direction: Vertical
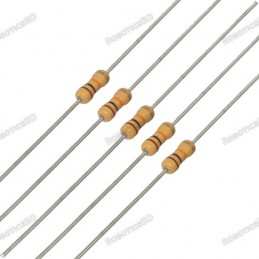
Reference: 1353
Length: 12.5 inches/30 CM (Long) Material: Copper Plated Pin Spacing: 2.54mm.


 Store Pickup Available!
 Free Ship Over 5000 BDT
 Quality Product
 No Warranty
 No Replacement
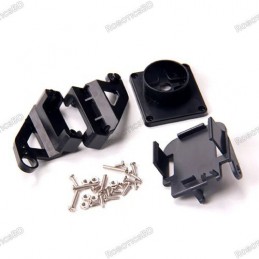
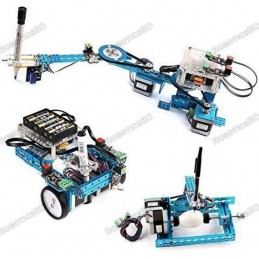
Make from PLA material for light weight and durable performance, You can control it by Arduino/Raspberry Pi single chip microcontroller Complete accessories, easy for installation and flexible movements. This is Arduino 4 DOF Robotic Arm. It uses MG90S small servos for driving the kinematics linkage. Featured By RoboticsBD.
Product Images are shown for illustrative purposes only and may differ from the actual product.
RoboticsBD RoboticsBD RoboticsBD RoboticsBD RoboticsBD RoboticsBD RoboticsBD RoboticsBD RoboticsBD RoboticsBD
Note: This Robotic arm does NOT come with control board, you have to buy it separately. RoboticsBD
Note: This Robotic arm does NOT come assemble, you have to assemble it yourself, you will find all the necessary parts, screws and motors inside the package
RoboticsBD RoboticsBD RoboticsBD RoboticsBD RoboticsBD RoboticsBD RoboticsBD RoboticsBD RoboticsBD RoboticsBD
| General Specification | |
| Brand | Generic |
| Color | White/Black/Blue |
| Net Content(gm) | 150 |
| Shipment Weight | 0.150 kg |
| Shipment Dimensions | 18 × 18 × 6 cm |
Please allow 5% measuring deviation due to manual measurement.
RoboticsBD RoboticsBD RoboticsBD RoboticsBD RoboticsBD RoboticsBD RoboticsBD RoboticsBD RoboticsBD RoboticsBD
1 x Robotics Arm EEZYbotARM MK1
1 x SG90 Servo motor
3 x MG90s Servo motor3
RoboticsBD RoboticsBD RoboticsBD RoboticsBD RoboticsBD RoboticsBD RoboticsBD RoboticsBD RoboticsBD RoboticsBD
RoboticsBD RoboticsBD RoboticsBD RoboticsBD RoboticsBD RoboticsBD RoboticsBD RoboticsBD RoboticsBD RoboticsBD
The latest price of Robotics Arm EEZYbotARM MK1 in Bangladesh is BDT 6,599 You can buy the Robotics Arm EEZYbotARM MK1 at best price from our RoboticsBD or visit RoboticsBD Office.
|
Please note that the product information provided on our website may not be entirely accurate as it is collected from various sources on the web. While we strive to provide the most up-to-date information possible, we cannot guarantee its accuracy. We recommend that you always read the product labels, warnings, and directions before using any product. |
|
Product Images are shown for illustrative purposes only and may differ from the actual product. |
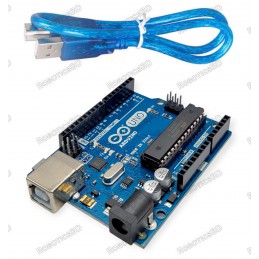
Reference: RBD-0094
The Arduino Uno R3 High-Quality Edition Arduino UNO in Bangladesh Micro-controller : ATmega328. Operating Voltage : 5V. Input Voltage (recommended) : 7-12V. Digital I/O Pins : 14 (of which 6 provide PWM output). Analog Input Pins : 6. The Arduino Uno R3 High-Quality Edition embodies superior craftsmanship and meticulous attention to detail, resulting in...
Reference: RBD-0120
400 tie points 2 Power lanes, Total 100 tie points in power lanes 1 Double strip, Total 300 tie points Perfect for Arduino shield prototyping and testing Plastic housing, metal contact clips
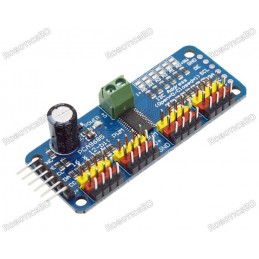
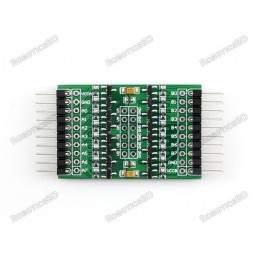
Reference: RBD-0289
Adjustable frequency PWM up to about 1.6 KHz 12-bit resolution for each output – for servos, that means about 4us resolution at a 60Hz update rate Configurable push-pull or an open-drain output The output enable pin to quickly disable all the outputs Terminal block for power input Reverse polarity protection on the terminal block input Green power-good LED
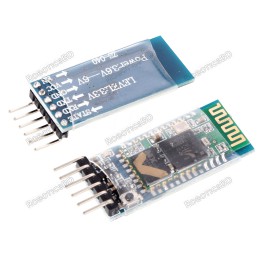
Reference: RBD-0905
Bluetooth protocol: Bluetooth Specification v2.0+EDR. Frequency: 2.4GHz ISM band. Modulation: GFSK(Gaussian Frequency Shift Keying). Emission power: =4dBm, Class 2. Sensitivity: =-84dBm at 0.1% BER. RoboticsBD
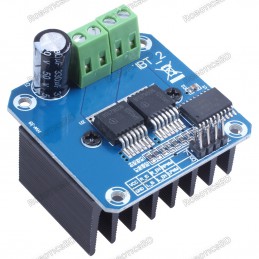
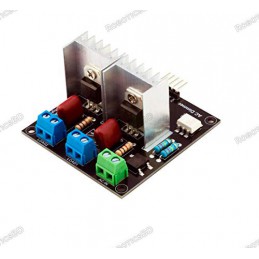
Reference: RBD-0742
Input voltage(V): 6 – 27. Maximum current(A): 43. Input level(V): 3.3 – 5. Duty cycle: 0 – 100%. Path resistance: 16 mΩ at 25°C. Low quiescent current: 7 µA at 25°C.
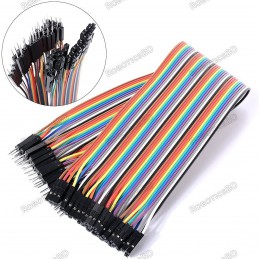
Reference: RBD-2106
40P color jumper wires Length: 300mm Weight: 45 gm Compatible with 2.54mm spacing pin headers High quality and in good working condition Durable and reusable Easy to install and use
Reference: RBD-2421
Product name: Humidifier Driver BoardColor: As showVoltage: DV 5VCurrent: 300mAPower: 2WFrequency: 110KHzSize: approx. 46 *20*17mm/1.81*0.79*0.67"
Reference: RBD-1331
High-quality BTA16-600B TRIAC AC Voltage: 220V/110V; 50/60Hz Rated current: 5A Logic: 3.3V/5V Peak Operating Current: 8A
Reference: RBD-0430
Operating voltage: 4.5V to 5.0 V Output format: 8 Analog and Digital voltages. Optimal sensing distance: 0.125″ (3 mm). RoboticsBD
Reference: RBD-0921
PV Nylon Head Two Axial plastic Two axial platform Anti-vibration lightweight Good design and shape Net weight 20g Color : Black Material: Plastic.
Reference: RBD-0265
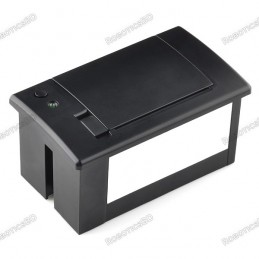
Printing method: Thermal dot printing Printing speed: 50 - 80mm/s Resolution: 8 points/mm, 384 points/line Effective print width: 48mm Character set: ASCII, GB2312-80 (Chinese)
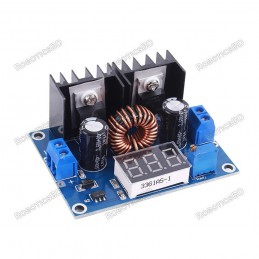
Reference: RBD-1724
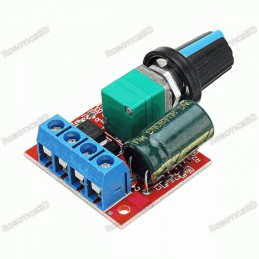
Operating voltage: DC4.5V-35V Output current: 0-5A Output power: 90W (max) PWM duty cycle: 1% -100%. PWM frequency:20khz Wide voltage DC motor speed controller.
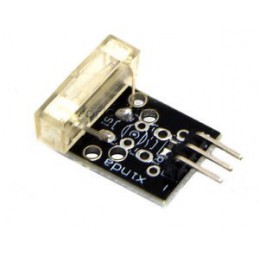
Reference: RBD-0352
Detect shocks with the spring and send a signal to Controller Board Operating voltage: 3.3V-5V Digital output Bolt holes for easy installation. RoboticsBD
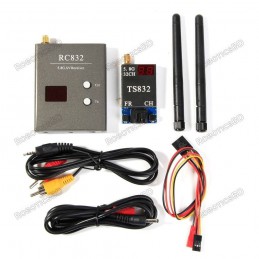
Reference: RBD-0379
TS832 RC832 5.8G 32CH 250mW FPV Transmitter Receiver 7.4-16V
Reference: RBD-1311
mDrawBot is a 4-in-1 drawing robot kit it can be assembled into 4 different drawing robots: mScara. mCar. mSpider. mEggBot.
Reference: RBD-1912
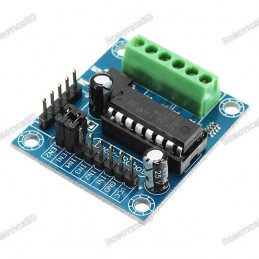
New L293D motor shield, the input voltage DC4.5-25V 600mA output current capability per channel 1.2A peak output current(non-repetitive) per channel Enable facility Overtemperature protection Logical “0” input voltage up to 1.5V(High noise immunity)
Reference: RBD-0658
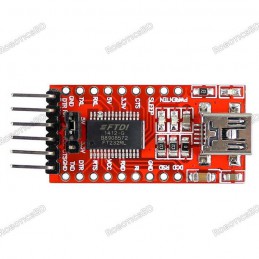
Standard interface layout, compatible with a variety of Arduinos such as the Pro Mini Original FTDI FT232 chip, stable performance USB power has current protection, using 500MA self-restore fuse RXD/TXD transceiver communication indicator With power, sending, receiving indicator, working status LED indicators Mini USB Port Connection Support 3.3V, 5V...
Reference: RBD-1653
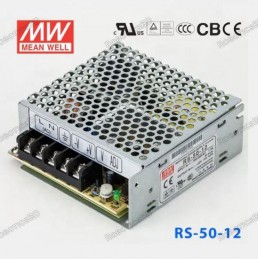
Input Voltage: 88~264V/47~63Hz Output Voltage: 12V/4.2A DC Output Power: 50W
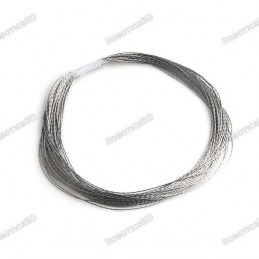
Reference: RBD-1842
Material: 12UM Stainless steel fiber Gram Weight: 0.2458g/m Strength: 2.8KGF. Length: 1m. Diameter(mm): 0.12. Resistance (Ω/m) : 27.
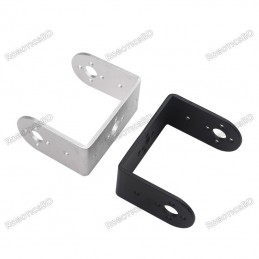
Reference: RBD-2002
U Bracket 2mm Hard aluminum Sandblasting Surface Multifunctional Bracket Click here Long U Bracket Click here Short U Bracket Click here L-shaped Servo Bracket Click here Oblique U Servo Bracket Click here U Beam Servo Bracket Click here Humanoid Robot Feet Servo Bracket Click here One Word Frame Servo Bracket Click here Bearing for Servo Motor...
Reference: RBD-1844
The head of the cables is stronger, Don’t worry it will easy to fall. Use for Arduino Or other kinds of circuit experiment. High quality and in good working condition Durable and reusable Easy to install and use
Reference: RBD-2215
Working voltage (V): 3.3 ~ 5 Working current (A): Above 1A Operating Temperature (℃): -10 ~ +50 Mounting hole: M3 Detection range: 1mm ~ 60 cm adjustable.
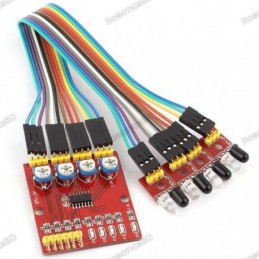
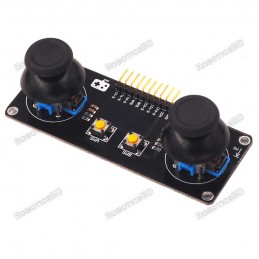
Reference: RBD-2291
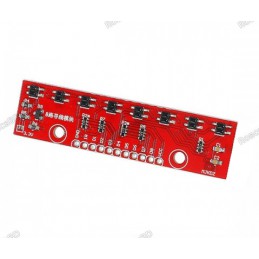
Functional configuration: 2 PS2 game joysticks (2 analog voltages per channel) 1 digital level) 2 independent buttons (original button) Product Features: The X and Y axes output are two potentiometers, and the twist angle can be read by AD conversion. Press the rocker down to send a touch switch, for digital output, has been pulled up Original Omron...
Reference: RBD-0829
Material: Aluminium M3 Screws Adjustable type servo arm Mounting Hole Spacing: 14mm Servo disc diameter: 20mm 25Tooth Weight: 2 gm
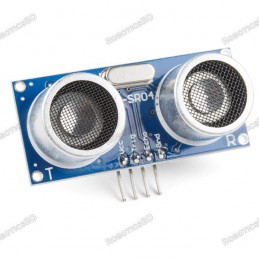
Reference: RBD-0022
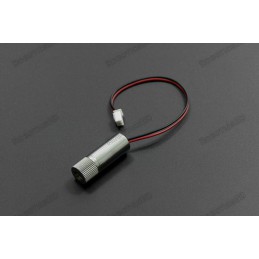
Affordable Price Operating Voltage: 5 V Sonar Sensing Range: 2-400 cm Max. Sensing Range: 450 cm Frequency: 40 kHz RoboticsBD
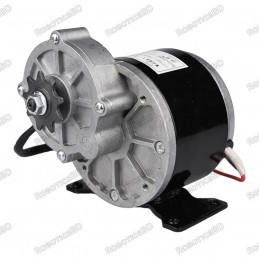
Reference: RBD-2058
Voltage: 12V Rated power: 250W Rated torque: 0.8N.m Rated speed: 2750RPM No loading current: ≤14A Rated current: 20A
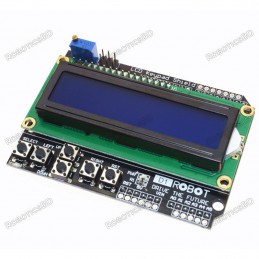
Reference: RBD-0159
Provides a user-friendly interface that allows users to go through the menu, make selections etc. It consists of a 1602 white character blue backlight LCD. The keypad consists of 6 keys select, up, right, down, left and reset. To save the digital IO pins, the keypad interface only uses one ADC channel. The key value is read out through a 5 stage voltage...
Reference: RBD-1709
Type: Hexagonal coupling. Material: brass. Inner diameter: 6 mm. Total length: 30 mm. Size of Hex Socket(Long Diagonal): 14mm Weight: 18.6gm
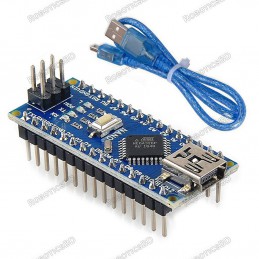
Reference: RBD-0032
USB Driver: CH340 Operating Voltage (logic level): 5V With Mini USB 8 analog inputs ports: A0 ~ A7 14 Digital input / output ports: TX, RX, D2 ~ D13 1 pair of TTL level serial transceiver ports RX / TX Using Atmel Atmega328P-AU MCU There is a bootloader installed in it Standard 0.1” spacing DIP (breadboard friendly). Manual reset switch. Please select...
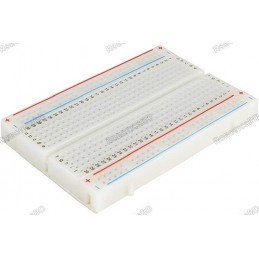
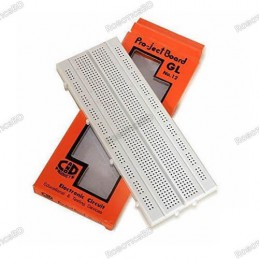
Reference: RBD-1886
830 Solder-less Points Ideal for Experimenting With Circuit Design In Labs Compatible with resistance, diodes, transistors, LED’s, Capacitors and other types of electronic components Colored coordinates for easy components placement. Accept a variety of wire sizes 20-29 AWG
Reference: RBD-2458
The XH-M404 Adjustable DC-DC Step-Down Module can can step-down the input voltage to a range of 1.25 – 36V at up to 8A.
Reference: RBD-0272
Brand: Waveshare
Voltage level: 1.8V-6V Dimension: 38mm x 31.6mm Conversion level range: 1.8 V-6 V Instructions for use: (3.3 V, 5 V to each other) 4 pairs of power supply interfaces, supports more situation Use tantalum capacitors for power filter, provides more stability VCCB 5V power supply (can be an external 5V power supply)
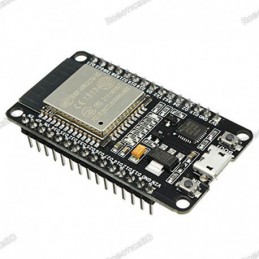
Reference: RBD-0948
Built-in Flash: 32Mbit Power supply: 5V WiFi protocol: IEEE 802.11 b/g/n Peripheral interface: UART/GPIO/ADC/DAC/SDIO/PWM/I2C/I2S Logic level: 3.3V