Reference: RBD-1354
Jumper Wire Single 20cm
Length: 8 inches/20 CM (Long) Material: Copper Plated Pin Spacing: 2.54mm.
Reference: RBD-1354
Length: 8 inches/20 CM (Long) Material: Copper Plated Pin Spacing: 2.54mm.
Reference: RBD-0351
Contactless transmission of data and supply energy (no battery needed) Operating distance: Up to 100mm (depending on antenna geometry) RoboticsBD Operating frequency: 13.56MHz Data transfer: 106 kbit/s Data integrity: 16 Bit CRC, parity, bit coding bit counting Anticollision Typical ticketing transaction: <100 ms ( including backup management)...
Reference: 0245
Choose your desire Resistor value from below:
Reference: 0031
3 Types Available (Please select from option) 1. Male to Male 2. Male to Female 3. Female-Female
Reference: RBD-0768
Size: 5mm Color: RED Head Shape: Round Lens Appearance: Transparent
Reference: RBD-0761
Breadboard friendly Mounting Style: Through Hole Mounting Direction: Vertical
Reference: 1353
Length: 12.5 inches/30 CM (Long) Material: Copper Plated Pin Spacing: 2.54mm.


Programmer: ESP32-CAM-MB MICRO USB Download Module
|
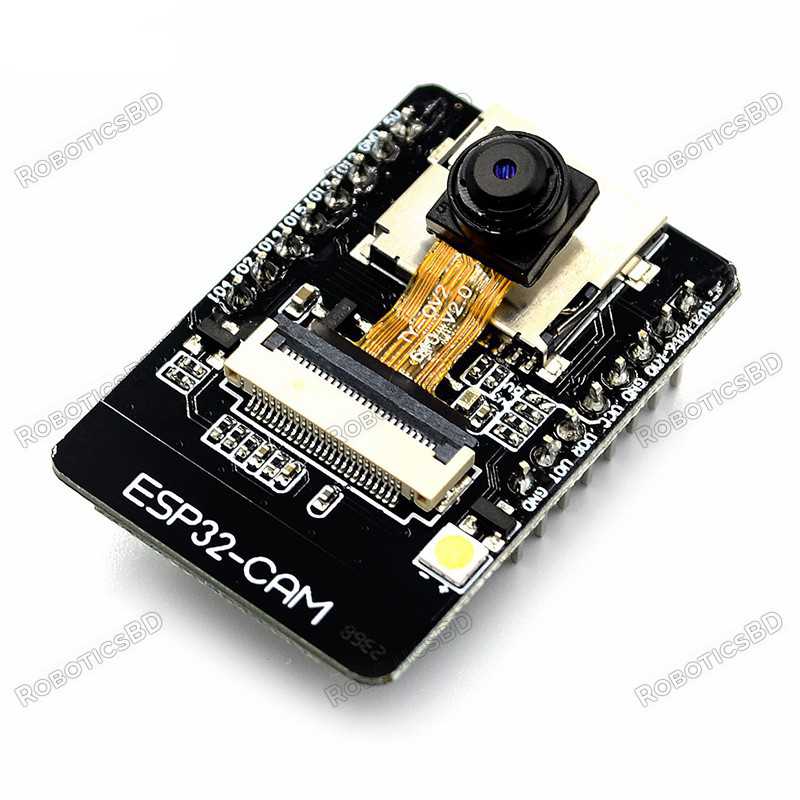
The ESP32 CAM does not come pre-assembled with the camera. You'll need to connect the camera ribbon cable to the board, a task which can be somewhat challenging. It's essential to ensure proper connection, as the camera will not function otherwise. Forceful insertion can damage both the camera and the connector. We recommend using tweezers for precision and urge you to exercise patience during this process. |
 Store Pickup Available!
 Free Ship Over 5000 BDT
 Quality Product
 No Warranty
 No Replacement
The ESP32 CAM WiFi Module Bluetooth with OV2640 Camera Module 2MP For Face Recognization has a very competitive small-size camera module that can operate independently as a minimum system with a footprint of only 40 x 27 mm; a deep sleep current of up to 6mA and is widely used in various IoT applications. RoboticsBD
It is suitable for home smart devices, industrial wireless control, wireless monitoring, and other IoT applications.
This module adopts a DIP package and can be directly inserted into the backplane to realize rapid production of products, providing customers with high-reliability connection mode, which is convenient for application in various IoT hardware terminals. RoboticsBD
ESP integrates WiFi, traditional Bluetooth, and BLE Beacon, with 2 high-performance 32-bit LX6 CPUs, 7-stage pipeline architecture. It has the main frequency adjustment range of 80MHz to 240MHz, on-chip sensor, Hall sensor, temperature sensor, etc. Featured By RoboticsBD.
Product Images are shown for illustrative purposes only and may differ from the actual product.
RoboticsBD RoboticsBD RoboticsBD RoboticsBD RoboticsBD RoboticsBD RoboticsBD RoboticsBD RoboticsBD RoboticsBD
|
The ESP32 CAM does not come pre-assembled with the camera. You'll need to connect the camera ribbon cable to the board, a task which can be somewhat challenging. It's essential to ensure proper connection, as the camera will not function otherwise. Forceful insertion can damage both the camera and the connector. We recommend using tweezers for precision and urge you to exercise patience during this process. |
Launch the Arduino IDE and navigate to File > Preferences.
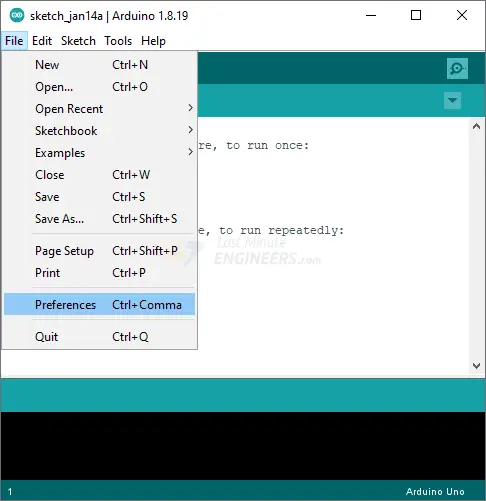
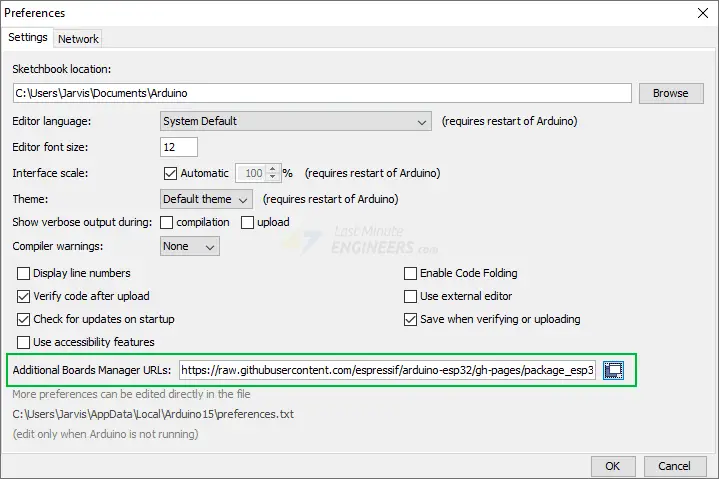
Fill in the “Additional Board Manager URLs” field with the following.
https://raw.githubusercontent.com/espressif/arduino-esp32/gh-pages/package_esp32_index.jsonThen, click the “OK” button.
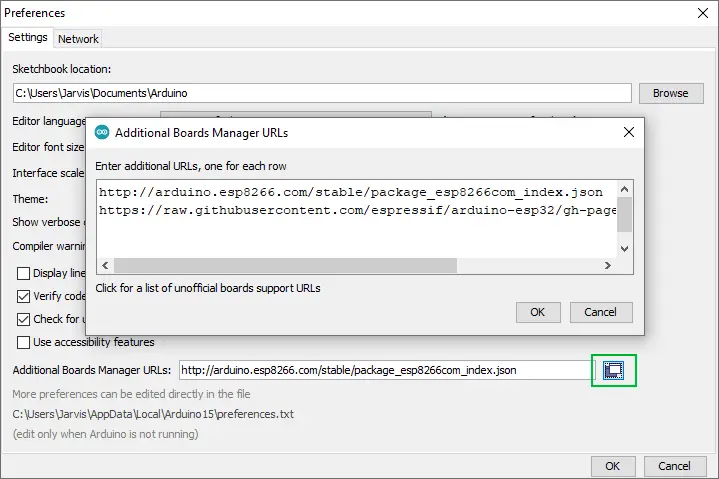
If you have already entered the URL for the ESP8266 boards or any other board, you can click on the icon to the right of the field to open a window where you can add additional URLs, one for each row.
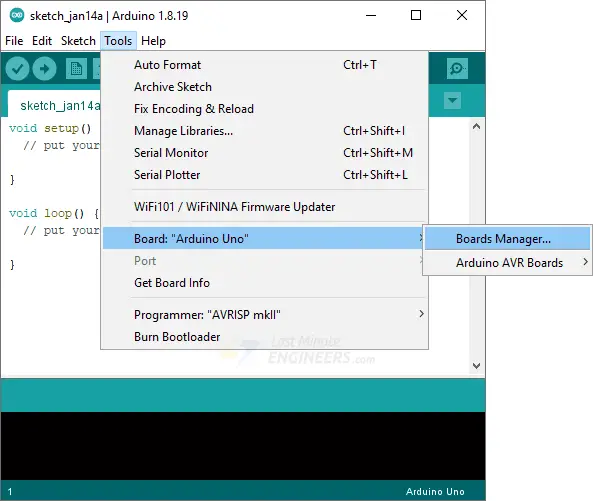
Now navigate to Tools > Board > Boards Manager…
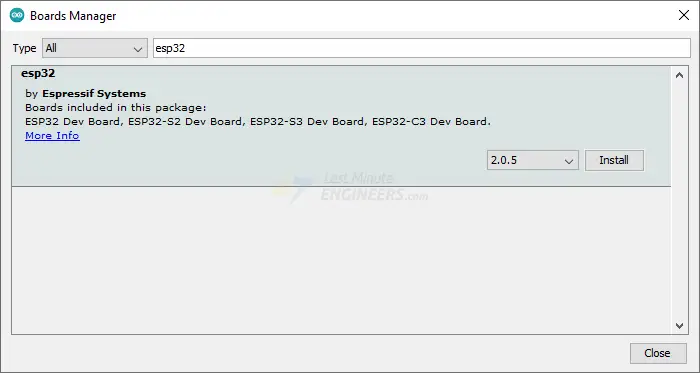
Filter your search by entering ‘esp32‘. Look for ESP32 by Espressif Systems. Click on that entry, and then choose Install.
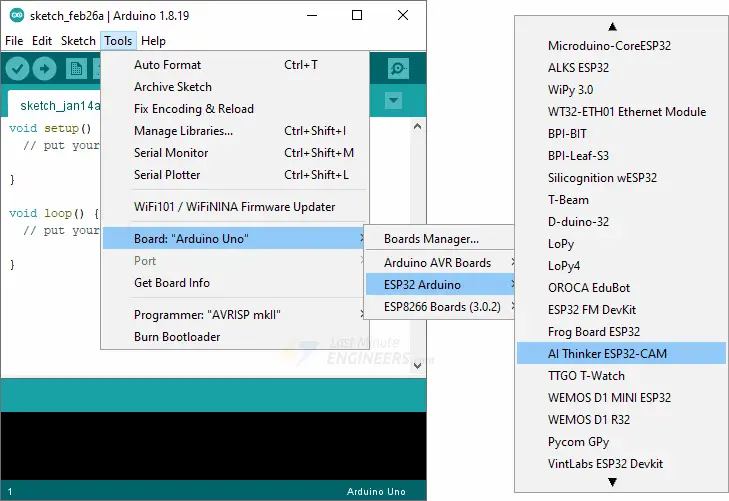
After installing the ESP32 Arduino Core, restart your Arduino IDE and navigate to Tools > Board > ESP32 Arduino and select AI-Thinker ESP32-CAM.
Now connect the ESP32-CAM to your computer using a USB cable. Then, navigate to Tools > Port and choose the COM port to which the ESP32-CAM is connected.
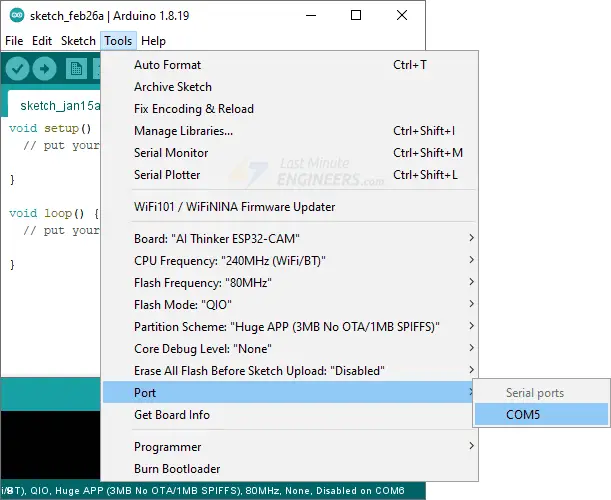
That’s it; the Arduino IDE is now set up for the ESP32-CAM!
Let’s try running the CameraWebServer sketch. This sketch transforms the ESP32-CAM into a full-featured webcam, complete with features like face detection and a ton of customization options. This is a very impressive example of what the ESP32-CAM can do!
You can find this example under File > Examples > ESP32 > Camera > CameraWebServer.
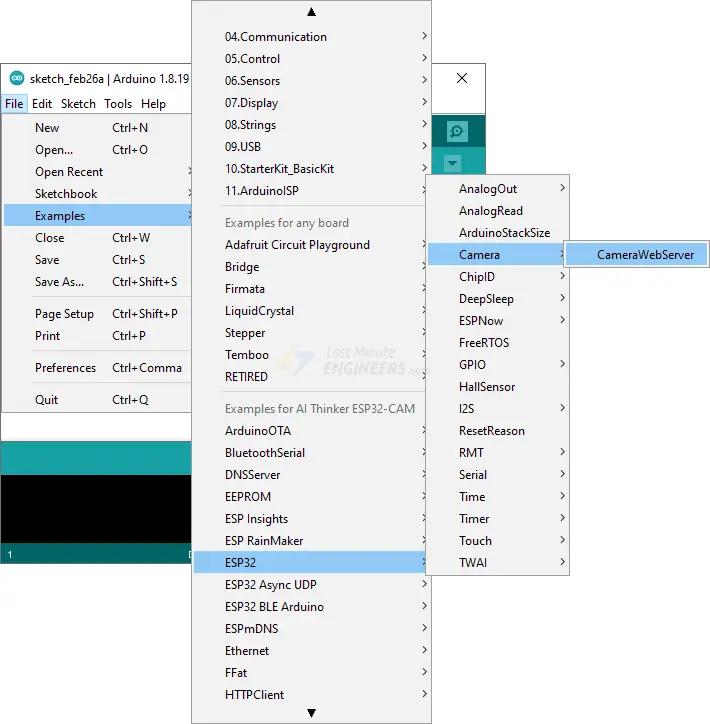
We’ll need to make a few changes to get this to work with your ESP32-CAM.
You must choose the appropriate camera model. Because we’re using the AI-THINKER model here, uncomment it and comment all the other models.
// ===================
// Select camera model
// ===================
//#define CAMERA_MODEL_WROVER_KIT // Has PSRAM
//#define CAMERA_MODEL_ESP_EYE // Has PSRAM
//#define CAMERA_MODEL_ESP32S3_EYE // Has PSRAM
//#define CAMERA_MODEL_M5STACK_PSRAM // Has PSRAM
//#define CAMERA_MODEL_M5STACK_V2_PSRAM // M5Camera version B Has PSRAM
//#define CAMERA_MODEL_M5STACK_WIDE // Has PSRAM
//#define CAMERA_MODEL_M5STACK_ESP32CAM // No PSRAM
//#define CAMERA_MODEL_M5STACK_UNITCAM // No PSRAM
#define CAMERA_MODEL_AI_THINKER // Has PSRAM
//#define CAMERA_MODEL_TTGO_T_JOURNAL // No PSRAM
// ** Espressif Internal Boards **
//#define CAMERA_MODEL_ESP32_CAM_BOARD
//#define CAMERA_MODEL_ESP32S2_CAM_BOARD
//#define CAMERA_MODEL_ESP32S3_CAM_LCD
Next, you need to tell the ESP32-CAM about your wireless network. Fill in the following variables with your network credentials:
const char* ssid = "REPLACE_WITH_YOUR_SSID";
const char* password = "REPLACE_WITH_YOUR_PASSWORD";
The code that needs to be modified is highlighted in yellow.
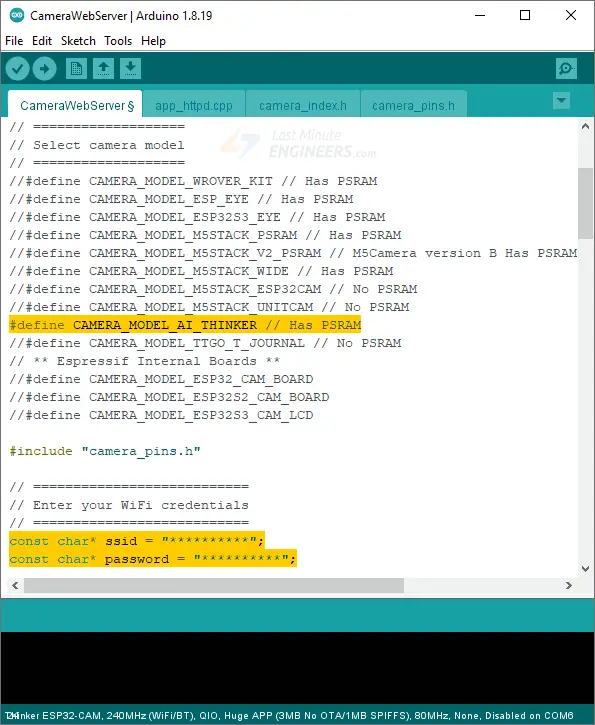
The code is now ready to be uploaded to the ESP32-CAM.
Once you have uploaded the sketch, open the serial monitor at baud rate 115200 and press the Reset button on the ESP32-CAM. You should see the IP address in the Serial Monitor.
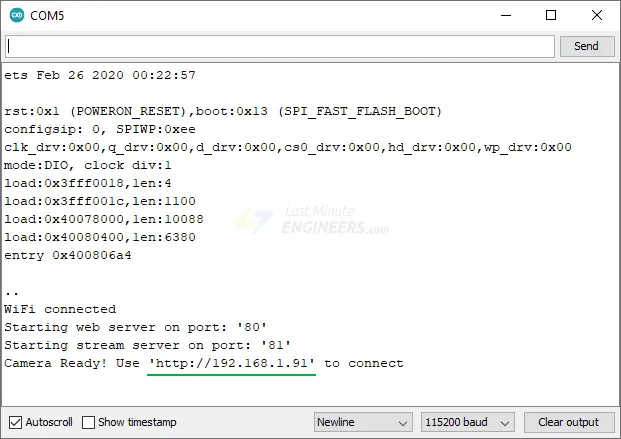
Launch a browser and enter the IP address shown on the serial monitor. Ensure that the web browser is on the same network that the ESP32-CAM is connected to.
The ESP32-CAM should display a web page. To begin video streaming, press the Start Stream button.
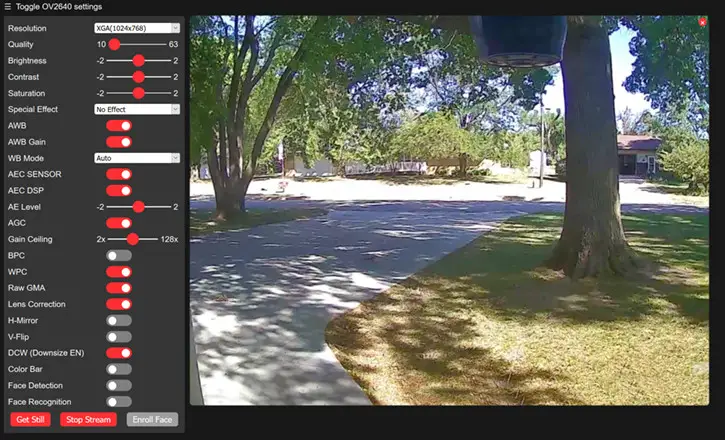
You can play around with various camera settings in the left pane. For instance, you can alter the video’s resolution and frame rate, as well as its brightness, contrast, saturation, and the like.
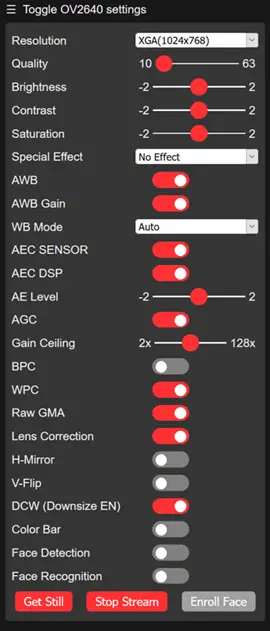
Simply hit the Get Still button to take a picture. Note that images are downloaded to the computer rather than being saved to the microSD card.
ESP32-CAM :
Specifications :
1 x ESP32 CAM WiFi Module.
1 x OV2640 Camera Module 2MP.
RoboticsBD RoboticsBD RoboticsBD RoboticsBD RoboticsBD RoboticsBD RoboticsBD RoboticsBD RoboticsBD RoboticsBD
RoboticsBD RoboticsBD RoboticsBD RoboticsBD RoboticsBD RoboticsBD RoboticsBD RoboticsBD RoboticsBD RoboticsBD
The latest price of ESP32-CAM WiFi + Bluetooth Camera Module Development Board ESP32 With Camera Module OV2640 in Bangladesh is BDT 848 You can buy the ESP32-CAM WiFi + Bluetooth Camera Module Development Board ESP32 With Camera Module OV2640 at best price from our RoboticsBD or visit RoboticsBD Office.
|
Please note that the product information provided on our website may not be entirely accurate as it is collected from various sources on the web. While we strive to provide the most up-to-date information possible, we cannot guarantee its accuracy. We recommend that you always read the product labels, warnings, and directions before using any product. |
|
Product Images are shown for illustrative purposes only and may differ from the actual product. |
 (29)
(29) (3)
(3) (1)
(1) (0)
(0) (0)
(0) (3)
(3)


Reference: RBD-1852
IPEX To SMA Female External Antenna Adapter SMA Male Antenna for 2.4G WIFI Module Only Antenna and Adapter RF Cable ESP32 Cam is not included
Reference: RBD-1976
High sensitivity for Low-Light Operation. Low Operating Voltage for Embedded Portable Apps. Supports Scaling. The Standard SCCB Interface is Compatible with the I2C Interface.
Reference: RBD-2044
Model: ESP32-CAM-MB Color: Black Chipset: CH340G Connectivity Technology: USB Note: The camera module is not included with the board.
Reference: RBD-1133
Compatible with NUCLEO-F411RE, onboard Cortex-M4 microcontroller STM32F411RET6 Arduino connectivity support, easy to connect with various Arduino shields and access the massive Arduino resources ST Morpho headers provide full access to all STM32 I/Os, easy for peripheral expansion Supports mbed, build prototype quickly by mbed SDK and online tools...
Reference: RBD-2850
Next-Gen UNO: Powerful 32-bit board with built-in Wi-Fi and Bluetooth for versatile IoT projects. Enhanced Performance: Increased speed, memory, and processing power compared to previous UNO models. Beginner-Friendly: Maintains the classic UNO form factor and familiar Arduino development environment. Built-in Extras: 12x8 LED matrix, Qwiic connector, and...
Reference: RBD-0155
Microcontroller: ATmega328 Circuit Operating Voltage: 5V Clock frequency: 16MHz. Digital I/O Pins: 14 8 analog input port: A0 ~ A7. A pair of TTL level serial port transceiver : RX / TX. 6 PWM port: D3, D5, D6, D9, D10, D11. Support serial download.
Reference: RBD-1218
Model No.:NX8048T050 Display Type:011R(R:Resitive Touchscreen) Operating Voltage (VDC):4.75 ~ 7 Max. Operating Current (mA):410 Touch Type: Resistive Colors:65K (65536)
Reference: RBD-0154
Microcontroller: ATmega32u4 Operating Voltage: 5V Input Voltage (Recommended): 7-12V Input Voltage (limits): 6-20V Digital I/O Pins: 20 PWM Channels: 7 Analog Input Channels: 12
Reference: RBD-0838
ATMEGA32U4 running in 5V / 16MHz Support Arduino IDE V1.0.1 Micro USB interface programming on the board Four 10-bit ADC pin 12 digital I / O (5 PWM capability) Rx and Tx hardware serial connection. RoboticsBD
Reference: RBD-1216
14-/20-pin DIP (N) Socket 20 pin LaunchPad standard leveraging the BoosterPack ecosystem On-Board EZ-FET emulator featuring EnergyTrace™ technology Supports MSP430G2xx2, MSP430G2xx3, and MSP430F20xx devices in PDIP14 or PDIP20 packages 1 user buttons and 3 LEDs for user interaction
Reference: RBD-1603
USB-TTL converter. Logic Level: 5V. Operating Supply Voltage: 5V. Digital I/O Pins: 14. Analog I/O Pins: 6.
Reference: RBD-2196
USB Type: Type-A to Type-B Weight: 26 gm. Length: 50 cm Long cable for easy work Fully compatible with the PC. Molded strain relief and PVC over-molding to ensure a lifetime of error-free data transmissions.
Reference: RBD-2271
Wide compatibility with ESP32-DevKitC(30P) series boards Safe and reliable with stable power and signal transmission Extended GVS interface for easy connection to various electronic modules and sensors JUMP interface for easy reuse of all pins, making it ideal for DIY projects Versatile and reliable option suitable for a wide range of projects
Reference: RBD-2569
Arduino Uno R4 Minima High-Quality Edition (Made in China) Introducing the Arduino UNO R4 Minima! This board boasts the RA4M1 microprocessor from Renesas, delivering increased processing power, expanded memory, and additional peripherals. And the best part? It stays true to the reliable UNO form factor and operates at a practical 5 V voltage. Brace...
Reference: RBD-0009
54 Digital I/O terminals (14 of which have programmable PWM outputs). 16 Analog Inputs. 4 UARTs (hardware serial ports). 16 MHz crystal clock. RoboticsBD Operating voltage: 6 ~ 12v. Dimensions: 110 x 53 x 15 mm.
Reference: RBD-2789
The ESP32-S3 WROOM Development Kit 2 is a comprehensive development solution based on the ESP32-S3-WROOM-1 module, featuring an onboard PCB antenna and advanced peripherals. This kit comes bundled with an OV2640 camera, providing a complete hardware platform for prototyping and developing IoT, AI, and wireless communication applications.
Reference: RBD-0948
Built-in Flash: 32Mbit Power supply: 5V WiFi protocol: IEEE 802.11 b/g/n Peripheral interface: UART/GPIO/ADC/DAC/SDIO/PWM/I2C/I2S Logic level: 3.3V A high-quality USB cable is essential for this board to ensure sufficient current supply; otherwise, your board may not be recognized by the Windows Device Manager. Please avoid using mobile phone cables and...
Reference: RBD-0694
Power input: 4.5V ~ 9V (10VMAX), USB-powered Transfer rate: 110-460800bps Support UART / GPIO data communication interface Support Smart Link Smart Networking Working temperature: -40°C ~ + 125°C Drive Type: Dual high-power H-bridge Don’t need to download resetting A great set of tools to develop ESP8266 Flash size: 4MByte Lowest cost WI-FI Note: The...
Reference: RBD-2199
Compatible with the Arduino IDE, making it easy for beginners to start using Smaller and cheaper than traditional Arduino boards Powered by a 16.0 MHz microcontroller Fully assembled except for headers, allowing for easy soldering Great for projects where size and cost are a concern Perfect for beginners to jump into electronics Can be used for a variety...
Reference: RBD-1821
Open-source, Interactive, Programmable, Low cost, Simple, Smart, WI-FI enabled Arduino-like hardware IO Integrated TR switch, balun, LNA, power amplifier and matching network Integrated PLL, regulators, DCXO and power management units Onboard USB to serial chip to easily program and upload codes from the Arduino IDE Easy to use breadboard friendly form...
Reference: RBD-1527
Based on ATmega32 8 Bit microcontroller USB external programmer Included Datasheet, Manual, Software & Sample codes All Port pins pins available for peripheral interfacing
Reference: RBD-1875
Fully compatible with the PC. Moulded strain relief and PVC over moulding to ensure a lifetime of error-free data transmissions. Aluminium under mould shield helps meet FCC requirements on KMI/RFI interference. Foil and braid shield complies with fully rated cable specifications reducing EMI/FRI interference.
Reference: RBD-1523
Microcontroller: ATmega328P Circuit Operating Voltage: 5V Clock frequency: 16MHz. 6 PWM port: D3, D5, D6, D9, D10, D11. Use For Atmel Atmega328P-AU microcontroller. Support serial download. Support 9V battery. A pair of TTL level serial port transceiver : RX / TX.
Reference: RBD-2288
Solves the problem of recessed Micro-USB ports with an extra-long 8mm connector tip. Universal compatibility: Works with various devices from top brands (Samsung, HTC, LG, etc.). Handles power, data transfer, and syncing for versatile use. Durable construction with thick 22AWG wires for efficient charging. 1-meter length provides convenient reach for...
Reference: RBD-1808
Model: F407VE-512K STM32F407VET6 development board F407 microcontroller learning board STM32 system board
Reference: RBD-2887
The Development Kit based on ESP8266, integrates GPIO, PWM, IIC, 1-Wire and ADC all in one board. Power your development in the fastest way combine with NodeMCU Firmware! R2 version had CP2102 USB-TTL instead, larger current support, slim board can put on breadboard. Programing it with Arduino IDE. A high-quality USB cable is essential for this board to...
Reference: RBD-1602
Microcontroller: ESP8266EX Operating Voltage: 3.3V Digital I/O Pins: 11 (all I/O pins have interrupt/PWM/I2C/one-wire capability, except for D0) Analog Input Pins: 1 Flash Memory: 4MB On-Board Switching Power Supply: Input Voltage Range: 9V to 12V Output: 5V at 1A Max
Reference: RBD-2764
The ESP32-S3-WROOM-1-N16R8 is a versatile Wi-Fi and low-power Bluetooth MCU module, featuring the advanced ESP32-S3 series chip. With its powerful performance, rich peripheral interfaces, and support for popular programming methods, this module offers a wide range of applications in various fields including IoT, AI, and smart devices.
Reference: RBD-1217
Nextion is a seamless Human Machine Interface (HMI) solution. Nextion provides a control and visualization interface between a human and a process, machine, application or appliance. Nextion is mainly applied to Internet of thing (IoT) or consumer electronics field.
Reference: RBD-2160
Fully compatible with the PC. Moulded strain relief and PVC over moulding to ensure a lifetime of error-free data transmissions. Aluminium under mould shield helps meet FCC requirements on KMI/RFI interference. Foil and braid shield complies with fully rated cable specifications reducing EMI/FRI interference.
Reference: RBD-0987
Compatible with Arduino NANO All digital and analog pins breakout Compact size; External power supply current support Leads all pins out, convenient for wiring and doing experiments.
Reference: RBD-2244
Wearable e-textile technology. Designed with large sew tabs Slide Switch
Reference: RBD-2483
Brand: Arduino Official
Arduino Opta, specially designed for PLC engineers, is a secure, easy-to-use micro PLC with industrial IoT capabilities. Opta is equipped with frequently used networks and protocols in multiple industries, and supports both Arduino sketch and standard PLC languages, including LD (Ladder Logic Diagram) and FBD (Function Block Diagram). Its powerful...
Reference: RBD-0343
Model number: TEC1-12706 Operating Voltage: 12V Maximum Voltage Umax (V) : 15.4V Maximum Current Imax (A) : 6A Maximum Power: 92 W Maximum Temperature: 138°C Power Cord: 200mm.RoboticsBD
Reference: RBD-1788
Through-hole design. Shaft Shape: Round Function: Push to ON High operating force (3.0N or 3.6N) suited to automotive equipment requirements The long life of 300,000 cycles realized despite the high operating force
Reference: RBD-0149
Output Channel: 1 Power Supply: 3.3/5V Built in a potentiometer for sensitivity control. Onboard signal output indication, output effective signal is high, at the same time the indicator light up, the output signal can directly connect to microcontroller IO. Detection angle about 60 degrees, the flame spectrum especially sensitive. The flame of the most...
Reference: RBD-0146
Easily integrate switching functionality into your breadboard projects with this compact and convenient SPDT slide switch. Ideal for 0.1" pitch breadboards with its 2mm pin spacing for seamless integration. Sturdy design with a satisfying click mechanism for reliable on/off or selection control. Suitable for various applications like power control, signal...
Reference: RBD-0998
Product type: DC power jack connector Connector type: Male connector Shape: cylindrical Colour: black and silver Size: 2.1mm x 5.5mm x 9mm
Reference: RBD-1612
HJC 474 0.47UF K 250V to 275 safety capacitor